Within this post I will show you how to setup a Solr cluster with a Zookeeper ensemble while load being distributed by an Azure loadbalancer.
Note: There is no SSL used and in the future the Azure loadbalancer might get replaced by an Application Gateway.
I would like to thank the owners (amongst others, I probably missed) of the following blogs for being a more than valuable source of information:
- https://joaoschmitt.wordpress.com/2018/07/21/solr-cloud-zookeeper-windows/
- https://lucene.apache.org/solr/guide/6_6/setting-up-an-external-zookeeper-ensemble.html
- https://born4joy.wordpress.com/2019/08/30/setup-solrcloud-with-zookeeper-for-sitecore/
- https://davegoosem.com/configuring-solr-for-sitecore/
Installation guide Solr cluster and Zookeeper ensemble on Windows
Used versions:
- Solr 7.5.0
- Zookeeper 3.4.14
- Windows datacenter 2019
- Sitecore 9.2 (XM)
001 - Deploying initial infastructure
For the installation of the Solr cluster the following resources will be deployed via ARM templates:
- Availability set
- Public IPs (3x A - 3x P)
- Network Interfaces (3x A - 3x P)
- Virtual Machines (3x A - 3x P)
The following resources have been created via the portal afterwards
- Azure public Loadbalancer (1x A - 1x P)
- NSG (1x A - 1x P)
Deploying the template from a Powershell command line
$SubscriptionId = SubscriptionId;
$TenantId = TenantId;
Connect-AzAccount -SubscriptionId $SubscriptionId -TenantId $TenantId;
$ActiveSubscription = (Get-AzContext).Subscription
$ActiveSubscriptionName = $ActiveSubscription.SubscriptionName
Write-Host Currently selected: $ActiveSubscriptionName -ForegroundColor Green;
$password = xxxxxxxxxxxxxx
$securePassword = ConvertTo-SecureString $password -AsPlainText -Force
New-AzResourceGroupDeployment -ResourceGroupName customer-a-rg `
-adminUsername vmuserx `
-adminPasswordOrKey $securePassword `
-TemplateUri https://github.com/bstoop-github/public/blob/master/armtemplates/azuredeploy.json
Please note that we use loops to create NICs and therefore have not assigned static internal IP addresses, these have been made static after they have been deployed
002 - Login to virtual machine(s) and create directories using Powershell below:
$createDirectories = @(
C:\solr\
C:\solr\solr-7.5.0
C:\solr\zookeeper-3.4.14
C:\solr\zookeeper_data
C:\installs
)
foreach($path in $createDirectories){
$validatePath = Test-Path -Path $path
if($validatePath -eq $False){
mkdir $path
}
else{
Write-Host Path $path already exists
}
}
003 - Install Chocolatey on all VMs using Powershell below:
Set-ExecutionPolicy AllSigned;
Set-ExecutionPolicy Bypass -Scope Process -Force; [System.Net.ServicePointManager]::SecurityProtocol = [System.Net.ServicePointManager]::SecurityProtocol -bor 3072; iex ((New-Object System.Net.WebClient).DownloadString('https://chocolatey.org/install.ps1'))
003-1 - Install Java (JRE) via Chocolatey
choco feature enable -n allowGlobalConfirmation
choco install jre8
Environment Vars (like PATH) have changed.
Close/reopen your shell to see the changes (or in powershell/cmd.exe just type ‘refreshenv’).
The install of jre8 was successful.
Software installed to ‘C:\Program Files\Java\jre1.8.0_261\’
refreshenv
Now set the JAVA_HOME PATH via elevated CMD
setx JAVA_HOME -m C:\Program Files\Java\jre1.8.0_261
refreshenv
echo %JAVA_HOME%
003-2 - Install NSSM, 7Zip and Notepadplusplus, telnet via Chocolatey
choco install nssm 7zip notepadplusplus telnet googlechrome -dvfy
004 - Zookeeper installation
Setup as ensemble
Download ZooKeeper here and save in C:\installs.
Extract content in C:\solr\zookeeper-3.4.14 folder
Rename-Item C:\solr\zookeeper-3.4.14\conf\zoo_sample.cfg -NewName C:\solr\zookeeper-3.4.14\conf\zoo.cfg
After that, open this file:
start notepad++ C:\solr\zookeeper-3.4.14\conf\zoo.cfg
The /conf/zoo.cfg file should have the content:
tickTime=2000
initLimit=10
syncLimit=5
dataDir=C://solr//zookeeper_data
clientPort=2181
server.0=internalip1:2888:3888
server.1=internalip2:2889:3889
server.2=internalip3:2890:3890
Now create environment variables and path from an elevated prompt:
setx ZOOKEEPER_HOME -m C:\solr\zookeeper-3.4.14;
setx PATH %PATH%;%ZOOKEEPER_HOME%\bin;
Go to bin directory
cd C:\solr\zookeeper-3.4.14\bin
Now start the zookeeper server.
In this case, the zookeeper will be started at 2181 port.
zkServer.cmd
Now, to check if the zookeeper is up and working properly, open a new terminal session and go to the zookeeper bin directory again. Then start the zookeeper client with the following command:
zkCli.cmd
Now close the command prompts and create myid files per zookeeper node:
These are the IDs and locations of all servers in the ensemble, the ports on whichthey communicate with each other. The server ID must additionally stored in the/myid file and be located in the dataDir of each ZooKeeper instance. TheID identifies each server, so in the case of this first instance, you would createthe file /var/lib/zookeeperdata/1/myid with the content 1.
on vm: customer-a-solr-cl-0
New-Item -Path C:\solr\zookeeper_data -Name myid -ItemType file -Value 0
on vm: customer-a-solr-cl-1
New-Item -Path C:\solr\zookeeper_data -Name myid -ItemType file -Value 1
on vm: customer-a-solr-cl-2
New-Item -Path C:\solr\zookeeper_data -Name myid -ItemType file -Value 2
To allow traffic within the subnet the following Windows Firewall rule has been added to each VM:
New-NetFirewallRule -RemoteAddress 10.244.240.0/20 -DisplayName Trusted Subnet -Direction inbound -Profile Any -Action Allow
004-1 - Installing Zookeeper As A Service
Kill the Solr instances by closing the corresponding Java processes or by entering the following commands in an elevated prompt:
cd C:\solr\solr-7.5.0\bin
solr stop -p 8983
From an elevated prompt:
nssm install zookeeper
and for later editing
nssm edit zookeeper
Add the following values:
path: C:\solr\zookeeper-3.4.14\bin\zkServer.cmd
startup dir: C:\solr\zookeeper-3.4.14\bin
Start the Zookeeper services via services.msc and verify if they are running (and keep running on reboot).
005 - SOLR installation
Download Solr here.
Extract content to C:\solr\solr-7.5.0
005-1 - Starting Solr on node 1, 2 and 3 with cloud mode.
Navigate to node 1, 2 and 3 Solr bin folder from Command Prompt window.
These commands create a Solr service on port 8983 and also attach them to the Zookeeper ensemble.
cd C:\solr\solr-7.5.0\bin
solr start -c -f -p 8983 -z internalip1:2181,internalip2:2181,internalip3:2181
The -f parameter allows for the service to always restart the currently running Solr process, without trying to spin a new one up. Ultimately, this is the expected behavior.
Check if Solr is running (on each node):
After confirming Solr was installed and connected to the Zookeeper ensemble as expected, we can kill the Solr instances by closing the corresponding Java processes or by entering the following commands in an elevated prompt:
cd C:\solr\solr-7.5.0\bin
solr stop -p 8983
005-2 - Installing Solr As A Service
From an elevated prompt:
nssm install solr
and for later editing
nssm edit solr
Add the following values:
path: C:\solr\solr-7.5.0\bin\solr.cmd
startup dir: C:\solr\solr-7.5.0\bin
arguments: start -c -p 8983 -z internalip1:2181,internalip2:2181,internalip3:2181
Start the Solr services via services.msc and verify they are running (and keep running on reboot).
005-2 - Upload Solr configuration to ZooKeeper
In node 1 folder, locate the configset folder under the “C:\solr\solr-7.5.0\server\solr\configsets” and copy the _default folder to a newsitecore_configs folder.
$from = C:\solr\solr-7.5.0\server\solr\configsets_default*
$to = C:\solr\solr-7.5.0\server\solr\configsets\sitecore_configs
Get-ChildItem -Path $from | % {
Copy-Item $_.fullname $to -Recurse -Force
}
In the sitecore_configs/solrconfig.xml file, set the autoCreateFieldssetting to false (update.autoCreateFields:false).
start notepad++ C:\solr\solr-7.5.0\server\solr\configsets\sitecore_configs\conf\solrconfig.xml
In this new folder, open the managed-schema file in the conf folder and do the following:
start notepad++ C:\solr\solr-7.5.0\server\solr\configsets\sitecore_configs\conf\managed-schema
Change the id value for id to:
_uniqueid
In the fields section, add the following field configuration for _uniqueid:
Assure you have saved the changes. Finalize upload, start elevated CMD
cd C:\solr\solr-7.5.0\bin;
solr zk upconfig -d sitecore_configs -n sitecore -z internalip1:2181,internalip2:2181,internalip3:2181
005-3 - Add Solr collections
You only have to execute the command below on 1 solr instance, the zookeeper ensemble will maintain the changes over all nodes.
cd C:\solr\solr-7.5.0\bin;
solr create_collection -c sitecore_core_index -n sitecore -s 1 -rf 2
solr create_collection -c sitecore_master_index -n sitecore -s 1 -rf 2
solr create_collection -c sitecore_web_index -n sitecore -s 1 -rf 2
Expect to create more collections when you are setting up Solr for a XP or XC application.
005-4 - Add Basic Authentication to SOLR
download security.json here and upload file to c:\installs directory on node1
cd C:\solr\solr-7.5.0\bin;
solr zk cp file:C:\installs\security.json zk:/security.json -z internalip1:2181,internalip2:2181,internalip3:2181
Now create a new user for with the following script: download here.
Now check the SHA256 password generated by browsing to: http://internalip1:8983/solr/admin/authentication .
Copy the new username and password and paste this in the file security.json file you downloaded.
cd C:\solr\node1\solr-7.5.0\bin;
solr zk cp file:C:\installs\security.json zk:/security.json -z internalip1:2181,internalip2:2181,internalip3:2181
The default ‘solr’ user is now blocked. And connectionstrings will become:
solraccUsername:solraccUsernamePassword@internalip1:8983/solr/
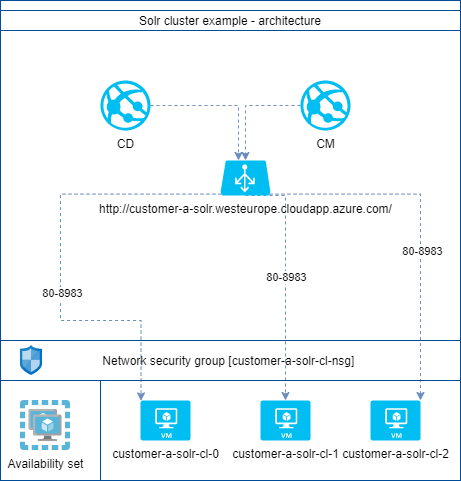
006 - Adding an Azure loadbalancer
For the load balancer to work correct we need to add NSGs to the NICs for the Solr nodes
The following NSGs have been created within the Azure portal:
customer-a-solr-cl-nsg
Within this there has been created a rule to allow the Azure load balancer connecting on port 80 and 8983. Since the health probe did not work on port 8983 (possibly because of the basic authentication) there is a website within IIS that is running on port 80.
The IIS installation has been done with the Powershell script found here .
- added Sitecore CM outbound IPs to NSG attached to Solr cluster NSG
- added Sitecore CD outbound IPs to NSG attached to Solr cluster NSG
006-1 - Add load balancer from within Azure portal
rg: customer-a-sitecore
name: customer-a-solr-plb
region: westeurope
pip: customer-a-solr-plb-pip [static]
SKU: standard
Now add backend pool with Solr/Zookeeper VMs
name: customer-a-solr-plb-backendpool
vnet: customer-a-vn
associate with vms: customer-a-solr-cl-0, customer-a-solr-cl-1, customer-a-solr-cl-2
Add health probe
name: customer-a-solr-plb-healthprobe
protocol: TCP
port: 80
Add load balancing rule
name: customer-a-solr-plb-lbrule
port: 80
backend port: 8983
Enable diagnostics
name: customer-a-solr-plb-diag
Added a DNS to the PIP for loadbalancer:
customer-a-solr.westeurope.cloudapp.azure.com
Since we restrict access to the VMs by NSG we can allow any IP to connect to port 81, 2181 and 8983 on the Solr nodes by adding the following firewall rule:
$name = allow_AzureLoadBalancerPIP
$RemoteAddress = Any
$Description = Allowing the Azure load balancer to connect to Solr
New-NetFirewallRule -DisplayName $name -RemoteAddress $RemoteAddress -Description $Description -Direction inbound -Profile Any -Action Allow -Protocol TCP -LocalPort 80, 2181, 8983 -RemotePort 80, 2181, 8983
007 - Implement new Solr cluster with Sitecore
Change the connectionstring.config solr.search value on CD and CM like below:
http://solrprdUsername:solrprdUsernamePassword@customer-a-solr.westeurope.cloudapp.azure.com/solr
007-1 - Populate Solr schemes and reindex
login to Sitecore CM
Go to Control Panel
Indexing -> Populate Solr Managed Schema
If populating fails -> repopulate until all succeed. (took three times)
Indexing -> Indexing manager -> Rebuild all indexes
Now Sitecore will be using the newly installed Solr cluster + Zookeeper ensemble via an Azure load balancer.